 Python
Using a virtual environment with Jupyter Notebook
Python virtual environments can be a great way to bundle a collection of libraries for a specific research area or project and keep it separate from other activities. However, our setup on the clusters does not make using them the most straightforward proposition.
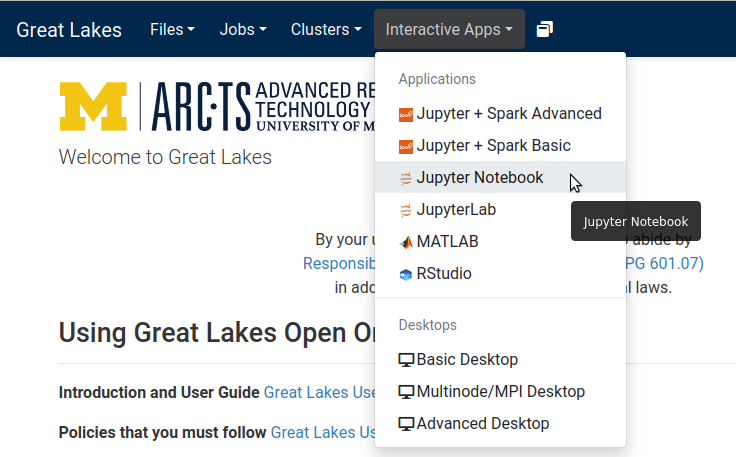
There are two steps: First, you must create the virtual environment; second, you must install the virtual environment as a Jupyter kernel. This is most easily done from inside a Jupyter environment, as that is where you will be using it. Using your web browser, go to Great Lakes Open OnDemand and select Jupyter Notebook from the Interactive Apps menu.
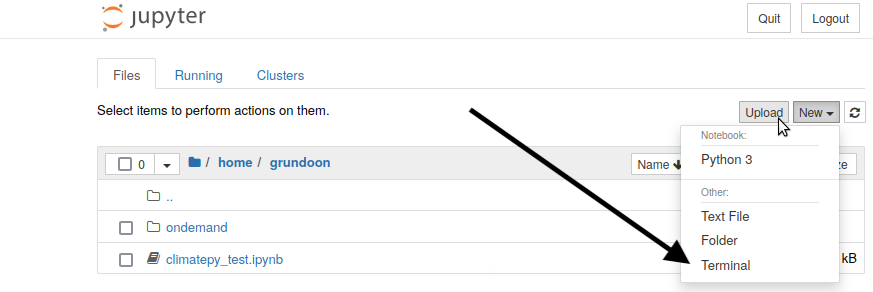
That will open the form to request a Jupyter Notebook session. When the session opens in your browser, you will be on the Jupyter tab. From the Jupyter tab, you can open a Notebook. You can also open a terminal session, which will be on the machine on which Jupyter is running. On the right side of the Jupyter tab, you will see three options: Upload, New, and the refresh icon.
Select the New pull-down menu, and from it, select Terminal. This will open a Terminal window in a new browser tab.
The terminal session will start in the root directory, so you should type
cd and press Return to get to your home directory. The prompt should
now have your login name, an @, the hostname, and the ~ character
in brackets. For the remainder of these instructions, we will abbreviate
the prompt as just $.
Creating the virtual environment
To use virtualenv with Anaconda, you need to install it first.
Install virtualenv with pip:
$ pip install --user virtualenv
. . . .
Successfully installed distlib-0.3.4 filelock-3.7.0 platformdirs-2.5.2
virtualenv-20.14.1
You should check that you now have the virtualenv command with
$ which virtualenv
~/.local/bin/virtualenv
You can now create a virtual environment. We will create a simple test
environment and install a Python package to convert from the Markdown
format to HTML. We will call it my_markdown, and we will install it
in your home directory.
$ virtualenv my_markdown
That will create a folder in the current directory which will contain the
Python executable files and a copy of the pip library which you can
use to install other packages.
To begin using the virtual environment, you must activate it. Since we created in in the home directory, we can use a relative path.
$ source my_markdown/bin/activate
If we were in a different directory, we would need to use the full path to the activate script; for example, in this case, that would be
$ source /home/grundoon/my_markdown/bin/activate
The name of the current virtual environment will now appear in parenthesis to the left of the prompt to let you know that it’s active.
When done working in the virtual environment, simply deactivate it:
(my_markdown) $ deactivate
Next, we will reactivate our environment and install the markdown library.
Note that when the virtual environment is active, pip will install libraries
into the virtual environment, so do not use the --user option.
$ source my_markdown/bin/activate
$ pip install markdown
Change into the my_markdown directory, create a file with some Markdown
in it, convert it to HTML, and show the converted file.
$ cd my_markdown
$ echo "
# My hello test

Hello from markdown

" > hello.md
$ python -m markdown hello.md > hello.html
That should print something like
<h1>My hello test</h1>
<p>Hello from markdown</p>(my_markdown) $
(my_markdown) $ prompt is appearing the same line as the
last line of the hello.html file because it does not contain a final
line ending. Just press Return to get the prompt back where it belongs.
We also need to install the ipykernel library into the virtual environment
so we can make it available to Jupyter.
$ pip install ipykernel
Finally, we use the ipykernel library to install our virtual environment
for use with Jupyter.
$ python -m ipykernel install --user --name=my_markdown
Installed kernelspec my_markdown in /home/<your name>/.local/share/jupyter/kernels/my_markdown
Return to the Jupyter tab on your browser and refresh the page. If you
again select the New option, you should see my_markdown in the list of
items, under Python 3. Select my_markdown to open a Jupyter Notebook with
the my_markdown virtual environment active.
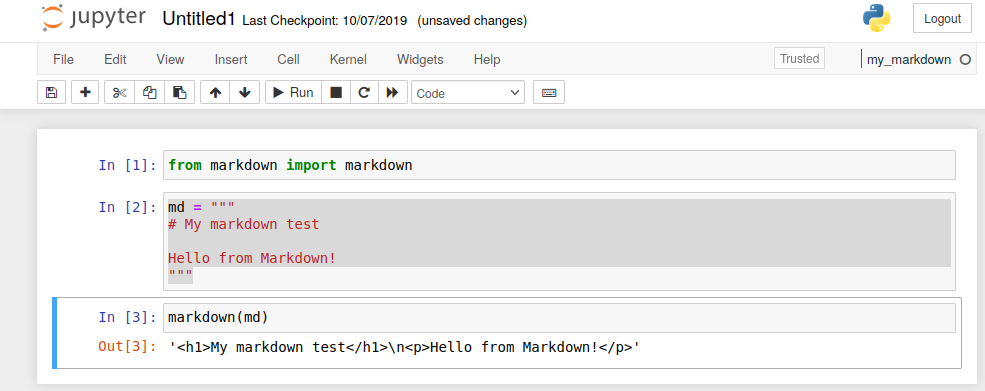
You can now test this by entering into the first three cells
from markdown import markdown
md = """
# My markdown test

Hello from Markdown!
"""
markdown(md)
Go to the Cell menu and select Run All. That should result in output like this.
Removing the kernel and virtual environment
To remove the test my_markdown virtual environment, it first needs to be
removed as a Jupyter kernel. First, make sure that the virtual environment has
been activated.
The following command will remove Jupyter kernel that refers to the
my_markdown virtual environment.
$ jupyter kernelspec remove my_markdown
Kernel specs to remove:
  my_markdown           /home/grunoon/.local/share/jupyter/kernels/my_markdown
Remove 1 kernel specs [y/N]: y
[RemoveKernelSpec] Removed /home/grunoon/.local/share/jupyter/kernels/my_markdown
You should now run the deactivate command.
Once the virtual environment has been deactivated, removing the virtual
environment is done by removing the directory that contains its files. In
this case, that should be ~/my_markdown, so
$ rm -r ~/my_markdown
will do so.