 Using Jupyter Notebook and JupyterLab
Setting up a complex Jupyter configuration
The ARC Open OnDemand instances offer you some fixed choices of Python to choose from. The Anaconda distribution(s) will cover most common scenarios except some machine learning packages, e.g., Torch, TensorFlow.
This page gives a step-by-step guide to installing a particular set of Python packages in a virtual environment and then setting that virtual environment up so it can be used with the Jupyter Notebook and JupyterLab applications.
These instructions assume that you are starting with a 'clean slate', by
which we mean there are no active Conda environments and nothing is installed
in ~/.local. These may work otherwise, but that is the environment
that was tested.
This assumes that you want to create the virtual environment in your home
directory (~); if you want it elsewhere, change the ~ in the initial cd
to the desired directory name. All of the commands that follow are preceded
by a $ prompt. If you copy and paste, do not copy the prompt. If there
are lines without an initial $, those are output, typically of the command
that precedes them.
$ cd ~
To be extra safe, we deactivate any Conda environments. It's fine if running
this tells you that The command: conda could not be found. This is a
safety measure for those for whom it is found.
$ conda deactivate
The first thing we want to do is insure that we have all, and only, the modules needed for our project, which is climate modeling. To do that we first remove all loaded modules, then load the ones we need.
# Clear modules
module purge

# Load the needed modules
$ module load python3.9-anaconda/2021.11 gcc/10.3.0 \
    proj/9.0.0 geos/3.10.2
The next two steps install an up-to-date version of pip and of virtualenv
into your ~/.local directory, which should be in your default PATH.
$ pip install --upgrade --user pip
$ pip install --user virtualenv
We verify this by checking where the system will find the virtualenv and
pip commands.
$ which pip
~/climatepy/bin/pip

$ which virtualenv
~/.local/bin/virtualenv
The next command creates the virtual environment in the directory climatepy
in the current directory. We are using the -p to specifically request
that the python that comes with the python3.9-anaconda module that we
loaded be the one in use in the virtual environment. Do NOT forget that!
Once the virtual environment has been created, it needs to be activated, which is done with the second command.
$ virtualenv -p $(which python) climatepy
$ source climatepy/bin/activate
(climatepy) $
(climatepy) [yourname@gl-login1 ~]$
We have a large list of packages that we are going to install, but when
we installed these on our own computer, we noticed that quite a few are
dependencies of others and will be installed automatically. Here is
the comment list of pip commands to install our desired environment.
# Install the needed packages

# metpy installs numpy, scipy, pandas, matplotlib, proj, pyproj, xarray
pip install metpy
pip install cmocean
pip install netCDF4
pip install glob2
pip install geos
# cartopy install shapely, pyshp
pip install cartopy
pip install proj

# pyyaml is needed by proj but not installed as a dependency; Bad people! Bad!
pip install pyyaml
Note here that two of these packages need the proj and geos libraries
available both to install properly and to run.
We are now done installing the Python packages we need for our science and data analysis.
Registering the virtual environment with Jupyter
Now that we have a fully installed virtual environment, we need to tell Jupyter where it is and how to use it. Note that we already have Jupyter because it is installed with the Anaconda Python distribution we are using.
We first have to install a Python package that does the registration, then we use it. Note that the name is independent of the name of the virtual environment, but it will lessen future confusion if you use the same name in both places.
$ pip install ipykernel
$ python -m ipykernel install --user --name=climatepy
You can now double-check that it is installed as a Jupyter kernel with
$ jupyter kernelspec list
Available kernels:
  climatepy    /home/<yourname>/.local/share/jupyter/kernels/climatepy
  python3      /home/<yourname>/climatepy/share/jupyter/kernels/python3
Using the new kernel
For this example, we will use the Great Lakes cluster as an example, but the steps are the same for Armis or Lighthouse.
For this set of Python packages, we needed to have additional software
modules loaded in addition to the python3.9-anaconda module. You enter
these into the 'Module commands' box.

You need these modules whether you are using Jupyter Notebook or JupyterLab.
Using with Jupyter Notebook
Go to the Great Lakes cluster and bring up the Jupyter Notebook form.
Once your Jupyter notebook has started, you should see climatepy listed as
an available kernel under the 'New' pull down menu.

Using with JupyterLab
Go to the Great Lakes cluster and bring up the JupyterLab form.
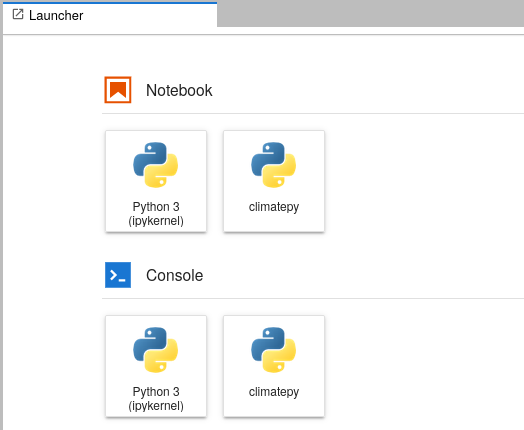
Once your JupyterLab has started, you should see a Python icon for climatepy
in both the Notebook and Console portions of the JupyterLab Launcher pane.
